
Content
#User interfaces of the platform
In this document, you can find screens of user interfaces with a description of their functionality.
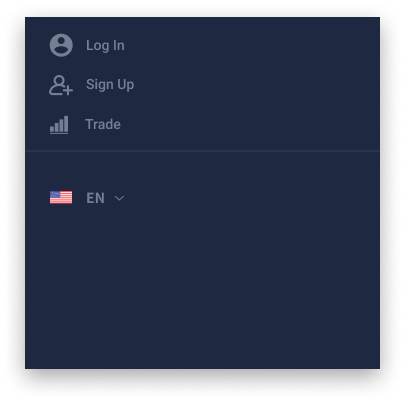
The main menu (upper-left corner) in the guest mode consists of Log In, Sign Up, Trade buttons and a selector for a language of the platform's interfaces. By default, the language set to English. To login into the account, a user needs to go to the main menu and click the Log In button.
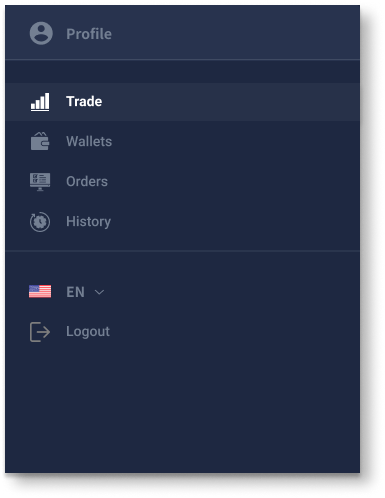
The main menu for the authorized user consist of the next elements:
Profileis a button that redirects to a user profile page.Tradeis a button that redirects to a trading page.Walletsis a button that redirects to a page with user's funds.Ordersis a button that redirects to a page with user's orders.Historyis a button that redirects to a page with deposits, withdrawals and trading history.- Language selector is a drop-down menu with a list of supported languages.
Logoutis a button that ends a session and logout the user from the platform.
In the next chapters, we will look in details on the elements of different pages and describe the functionality of the platform.
#1. Login in & Sign up
Authorization window has two tabs: SIGN IN and SIGN UP. User can switch between login and signup forms clicking the corresponding tab.
Sign In form description:
- Email: is a field for email. A user needs to enter the email that he used to create an account on the platform. The platform does email validation.
- Password: is a field for password. A user needs to enter the password from his account.
On click SIGN IN button sends a login request to the platform.
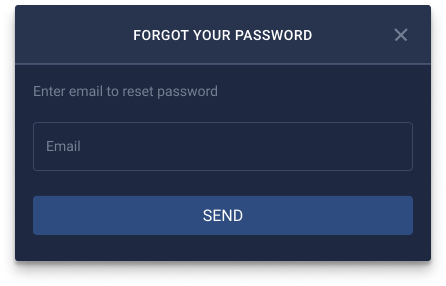
Forgot your password? is a text button that brings up a form for a password reset.
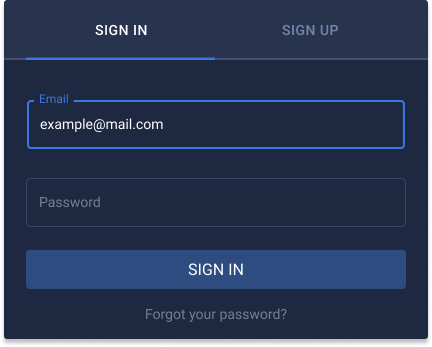
If a user has enabled two-factor authentication, the platform brings up a form for 2FA code after a user-entered Email and Password.
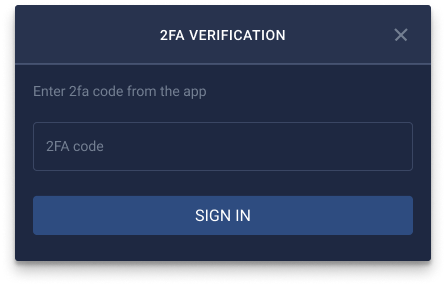
To reset a forgotten password a user needs to perform the next actions:
- Press
Forgot your password?button.FORGOT YOUR PASSWORDwindow appears. - In the
FORGOT YOUR PASSWORDwindow user needs to enter an email that connected with his account. - When a user entered the email he needs to click the
SENDbutton.
After receiving the request to reset the password the platform sends a letter with a reset password link to a user email.
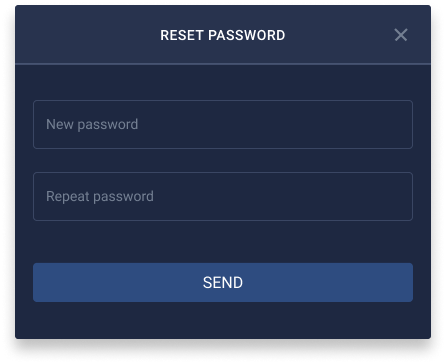
A reset password link that a user receives on his email redirect him to the platform page and brings up the RESET PASSWORD window. To reset the old password a user needs:
- to enter a new password in the
New passwordfield. - to reenter the new password in the
Repeat passwordfield. - to click the
SENDbutton. If processing was successful, the platform updates the user's password. After that, a user can log in with a new password.
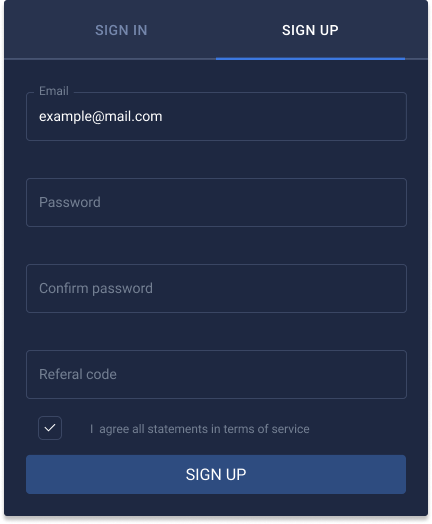
If a user wants to create account he needs to use the SIGN UP form. In SIGN UP form user needs to enter email, create a password and provide referral code (optionally).
Sign Up form description:
- Email: is a field where user needs to enter his email.
- Password: is a field where a user needs to enter a strong password that meets all requirements. Password must be at least 8 characters with one uppercase letter and one number. Entered password goes throw entropy check, also system do dictionary check to prevent the use of common passwords.
- Confirm password: is a field where a user needs to enter the same password.
- Referral Code: is a field for code from the referral program. Registered users can provide their referral codes for users that are going to registrate on the platform.
- Terms of Service: is a Terms of Service checkbox. If a user checked the checkbox it means that he agrees with Terms of Service provided by the platform.
After filling the form, a user needs to click Sign up to send a registration request. If the request was successful, the platform creates an account and the user can log in using his credentials.
#2. Profile
The profile menu consists of three windows: Account, My API Keys and Account activity. Account window contains profile information and tools to manage the account.
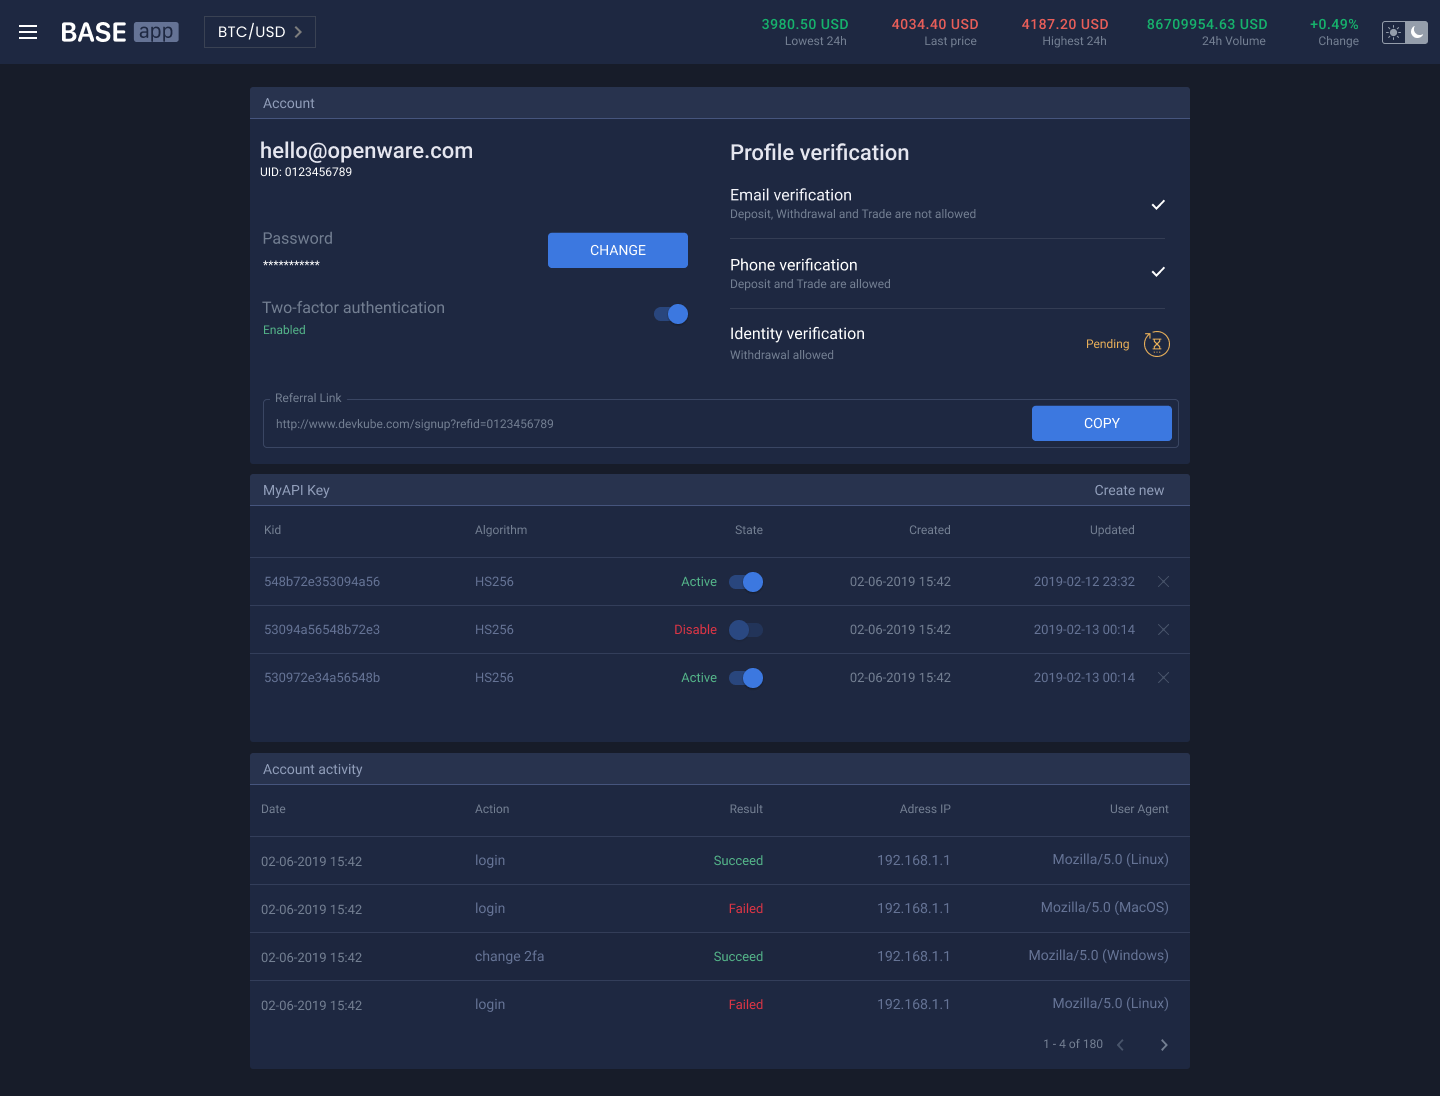
Description of the Account window:
On the left side of the account window, shows an
Emailthat belong to a user.Under
EmailshowsUIDof a user.UIDis a unique identifier on a user on the platform.The next is a
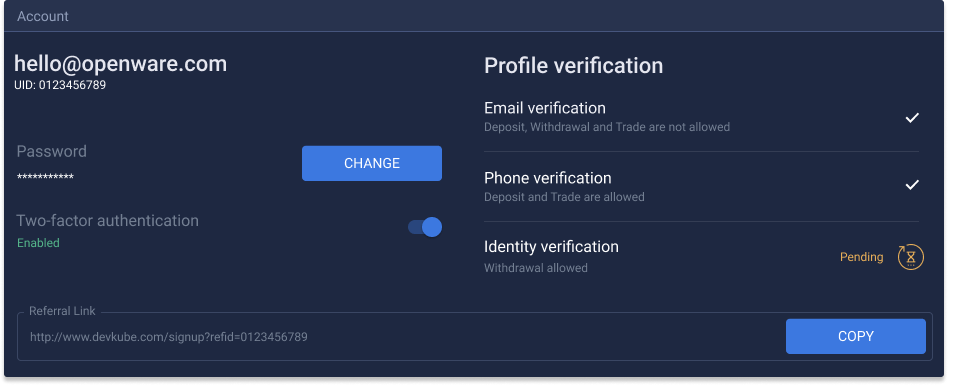
Passwordfield with the buttonCHANGE. Clicking theCHANGEbutton brings up a modal window using. To change a password, a user needs to type an old password in theOld Passwordfiled and a new password inNew PasswordandConfirm Passwordfields. After that, a user needs to press theCHANGEbutton to apply password changes.
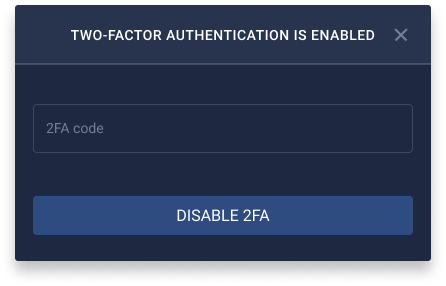
- The
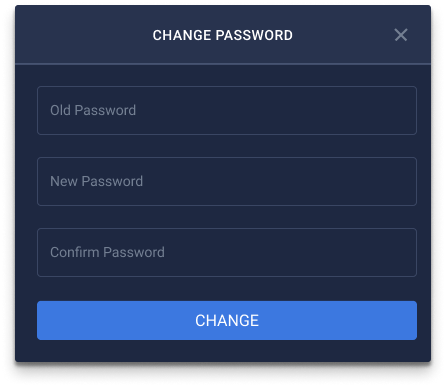
Two-factor authenticationfield shows a 2FA status and provide the ability to enable and disable 2FA. When a user clicks the switch button, the platform brings up a form with instructions. A user needs to follow instructions, fill the data and submit the form to enable 2FA.
If a user wants to disable 2FA, he needs to click the 2FA switch button. The platform brings up a window where a user needs to submit 2FA code to disable 2FA.
The
Referral linkis a link that a user can copy and share to affiliate new users to the platform. When an affiliate follows the referral link, the platform opens up theSign upform with pre-filled referral code.The
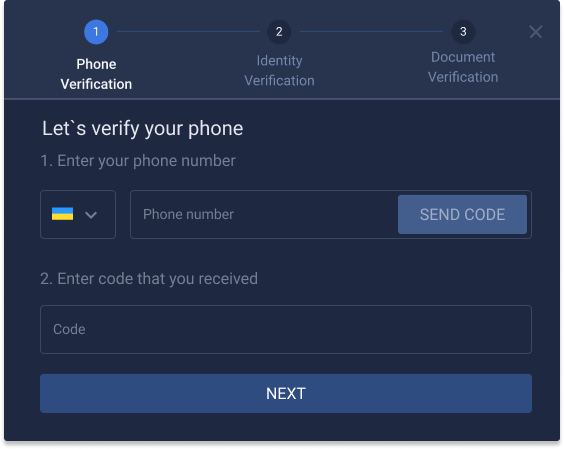
Profile verificationis a list of steps that a user needs to pass to get corresponding permissions. By default, a user has to pass three steps to get all permission. The number of steps and permission on each of them can be customized before the deployment.- Step 1 - is a step where a user needs to verify his phone number. First, a user needs to enter phone number than the platform sends SMS with verification code. Second, a user needs to submit a verification code to verify the phone number.
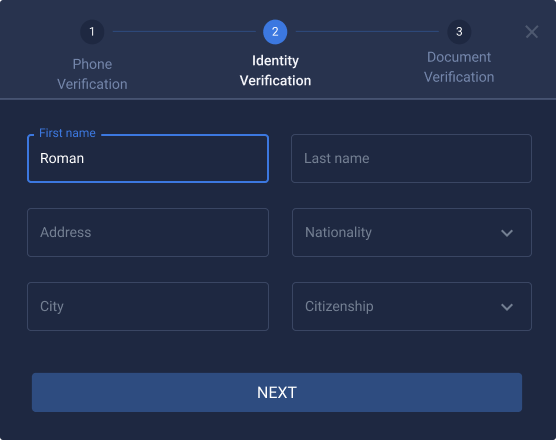
- Step 2 - is a step where a user needs to provide his personal information:
First name,Last name,Address,Nationality,City,Citizenship,PostcodeandDate of birth.
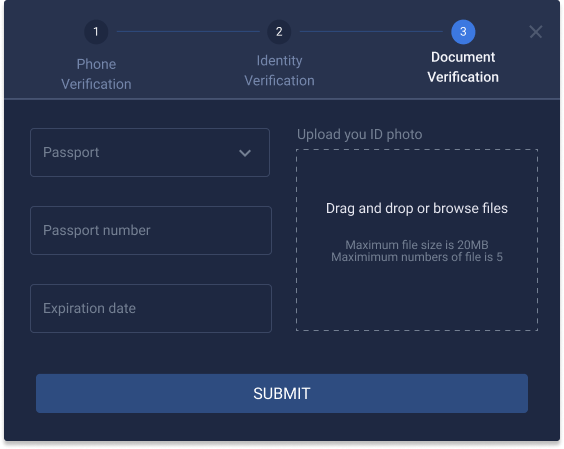
- Level 3 - is a step where a user needs to provide a document that proofs his identity. As a proof of identity, a user can upload a photo of a passport or an identity card. Submitted documents require manual verification from the admin side.
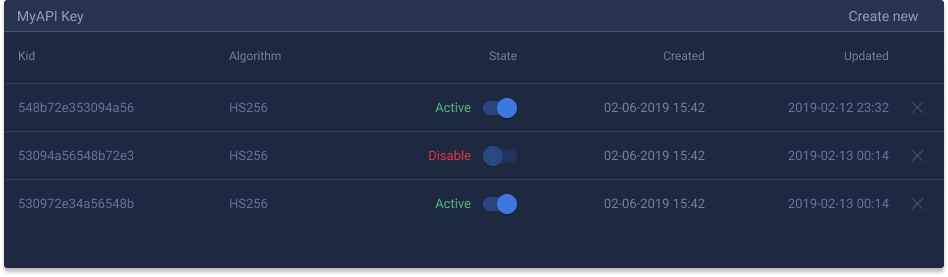
Description of the My API Keys window:
My API Keys is a window for API keys management. To be able to create and manage API keys, a user needs to enable 2FA.

To create a new API key a user needs to click the Create new button, then pops up a window for 2FA code in which a user needs to enter 2FA code.

After that, a window with a new API key appears. A user needs to copy the Access key, the Secret key and to click the CONFIRM button. The Secret key shows only once. If a user forgot or lost Secret key, he can delete that API key and generate a new one.
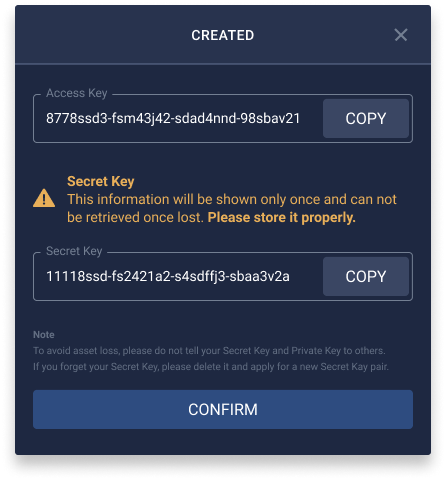
The new API key appears in the My API Keys window where a user can manage that API key. To disable an API key a user needs to click the switch button than a user needs to enter 2FA code. To delete an API key a user needs to click the X button than a user needs to enter 2FA code.
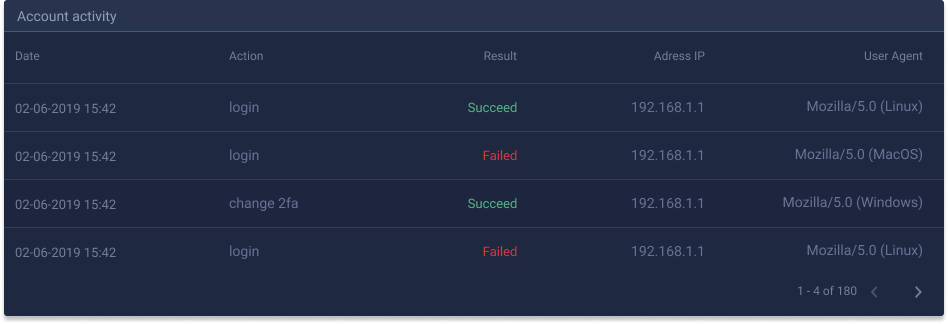
Description of the Account activity window:
Account activity is a window that contains information about a resent action of a user on the platform.
Field name description:
- Date: shows the date of an activity.
- Action: shows the action type performed by a user.
- Result: shows the result of an action. The result can be
SucceedandFailed. - Address IP: shows the IP address of a user computer from which the action was performed.
#3. Trade
The trading page contains components that are essential for trading. A user can customize the size and position of components of all components on the trading page.
Chart
The chart shows a graphical representation of an asset price for a certain time frame. The platform uses the TradingView chart component.
The TradingView chart is customizable and provides the next functionality to a user:
- to draw using drawing toolbar;
- to change chart timeframe and to zoom it using scroll;
- to change chart representation (Bars, Candles, Hollow Candles, Heikin Ashi, Line, Area, Baseline);
- to do chart comparison of different markets;
- to add multiple indicators to market chart;
- to undo or redo chart editing;
- to take instant snapshots. The user can save snapshot locally or share a snapshot link;
- to save chart layout;
- to change chart properties;
- to open chart in fullscreen mode.

Order book
The order book shows detailed information about orders that are waiting for fulfilment. This component resizable and can be in one of two modes: vertical and horizontal. The order book consists of Buy and Sell orders separated by the last market price. If the order book set in the vertical mode Sell orders located in the upper part of the order book and Buy orders located in the lower part of the order book. If the order book set in the horizontal mode Sell orders located on the right part of the order book and Buy orders located on the left part of the order book. The order book consists of three columns: Price, Total and Amount.
Price column in the order book shows price levels of orders. If the order book in the vertical mode Buy orders with the highest price and Sell orders with the lowest price located next to the field of the last market price.
Amount column shows the quantity of base currency that a user wants to sell or buy at the certain price level.
Total column shows the cumulative amount of a base currency placed in the orders at a certain price level. The Total column shows the market depth. Alongside with the Total column, the order book has a graphical representation of the market depth in the way of coloured horizontal bars.
Below, you can find examples of the order book in vertical and horizontal mode.

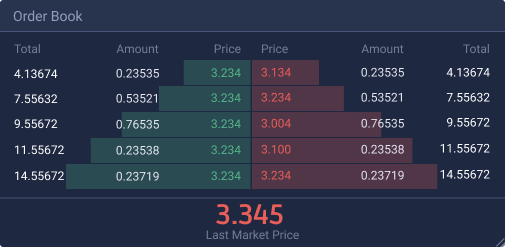
A user can use the order book to prefill the order form with a price and an amount. A user can fill the order form with a certain price by clicking the price field of a certain order in the order book. A user can fill the order form with a certain price and a certain amount by to clicking the amount field of a certain order in the order book. Also, a user can fill the order form with a certain price and a certain amount (that represent liquidity at a certain price level) by clicking the total field of a certain order in the order book.
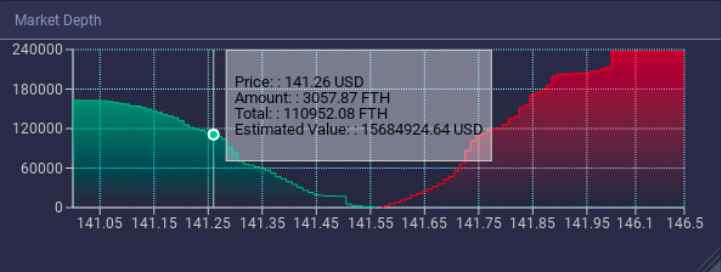
Market Depth
The Market depth window shows a grid with buy and sells orders at a certain price level. Market depth has two sides the left side shows Bids (coloured green) and the right side shows Asks (coloured red). On hovers pops up a window with detailed information on liquidity level of a certain price level.
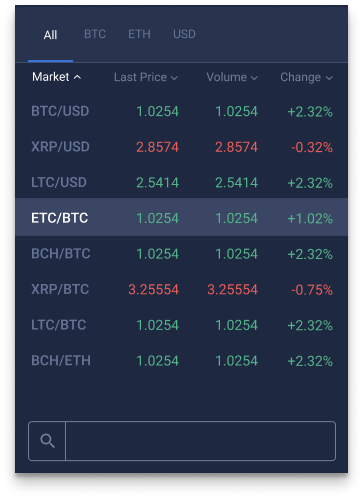
Markets
The markets window shows trading pairs that are supported by the platform. Header part of the markets window contains tabs. The All tabs show all market pairs. The rest tabs represent market pair of a certain quote currency. The table part of the market window has Markets, Last Price, Volume and Change:
- Market: shows market pairs that are supported by the platform.
- Last Price: shows the price of the last trade of a certain market pair.
- Volume: shows a cumulative trading volume of a certain pair for the last 24 hours (showed in a quote currency).
- Change: shows a change of a price in the certain market pair for the last 24 hours.
The search field allows searching for a certain market pair or a ticker.
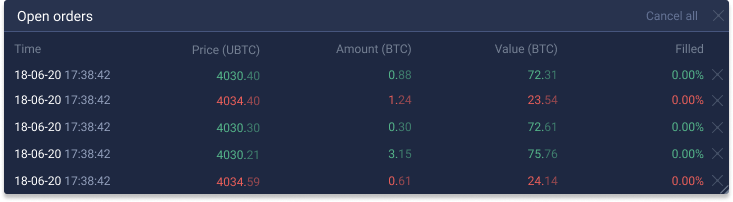
Open Orders
The open orders window shows information about active orders. That window contains open orders that are related to the chosen market pair. The open window table has the next column: Time, Price, Amount, Value, and Field:
- Time: shows date and time of order creation.
- Price (a quote currency): shows a price at which a user wants to buy or sell an asset.
- Amount (base currency): shows an amount that a user wants to sell or to buy.
- Value (a quote currency): shows order an approximated value of an order in a quote currency.
- Field: shows the execution percentage of an order.
Clicking the X button allows cancellation of the user's open order.
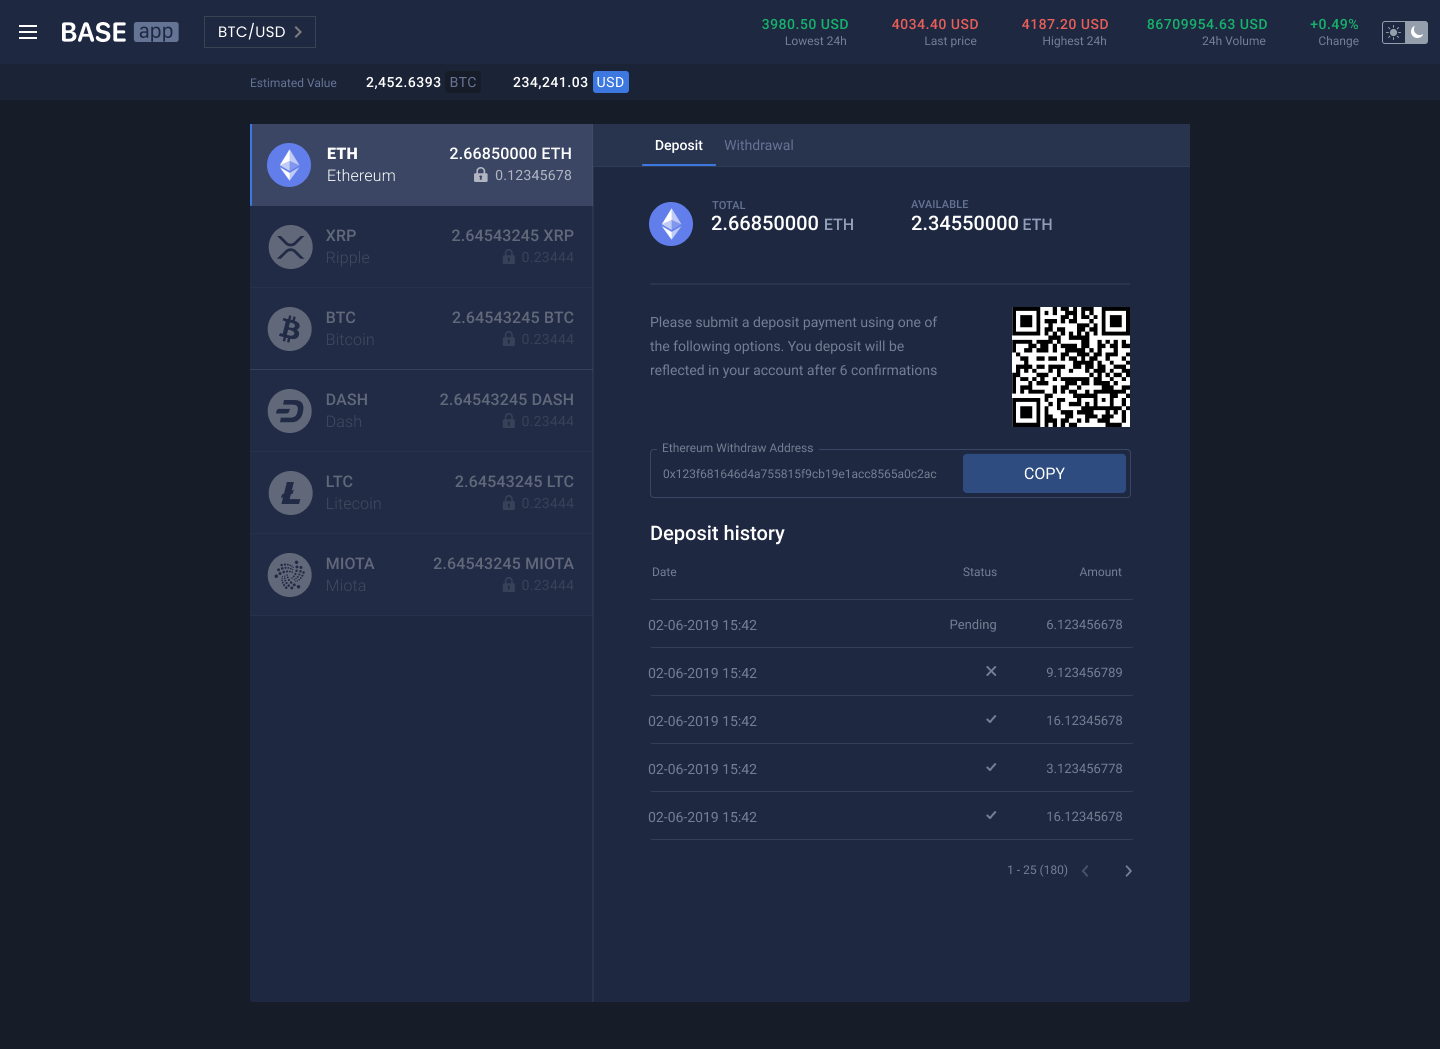
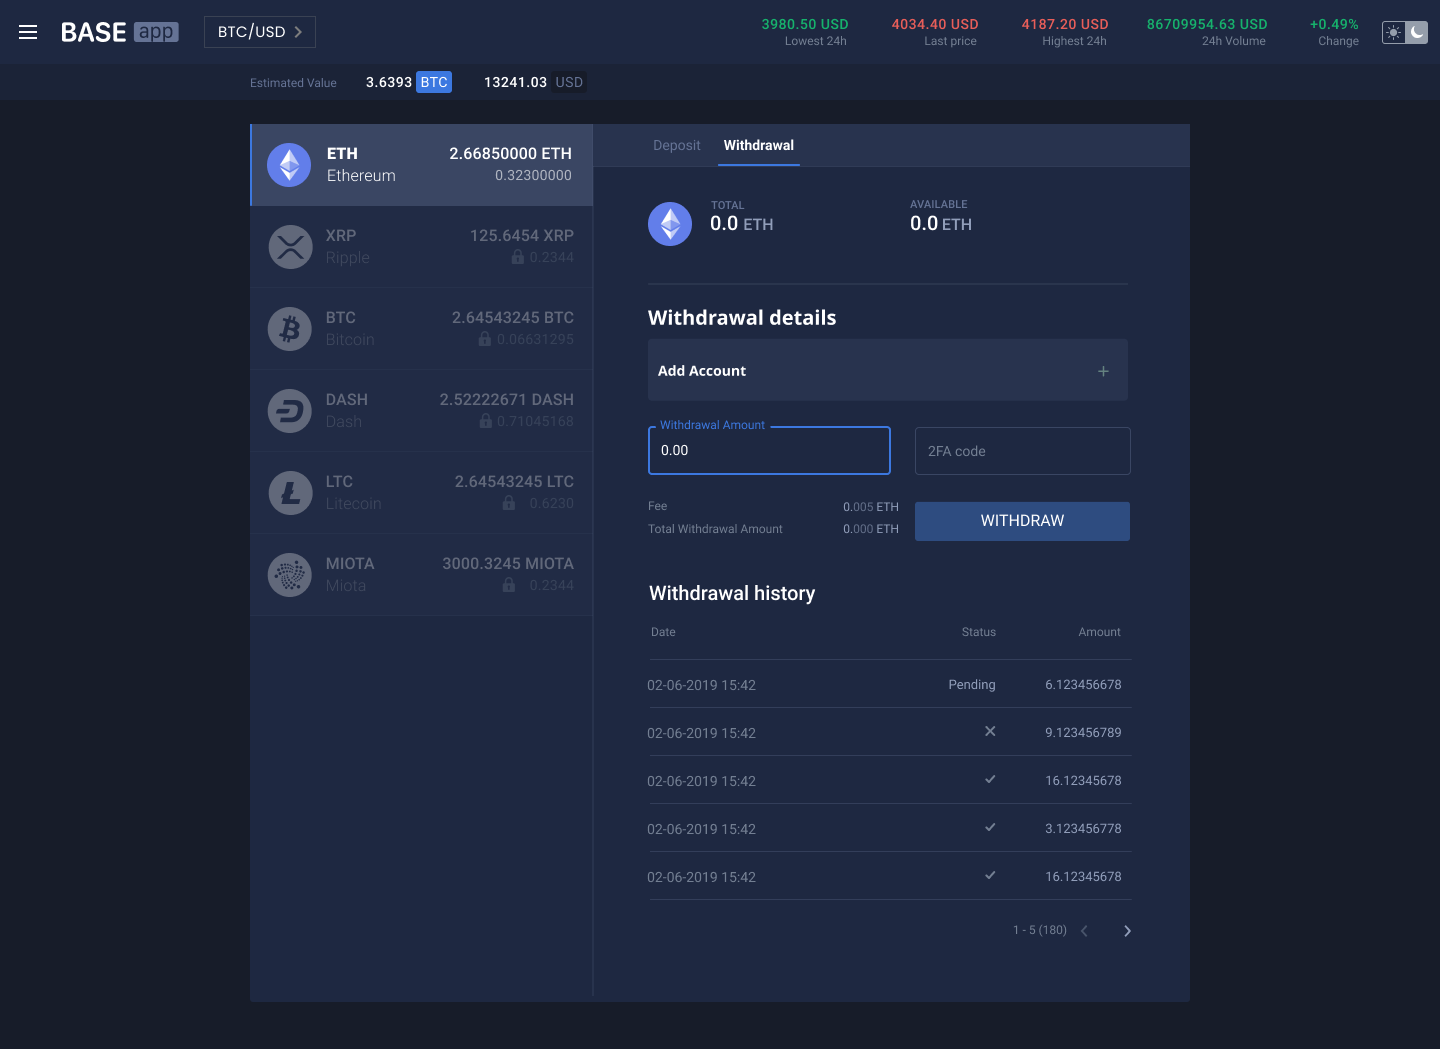
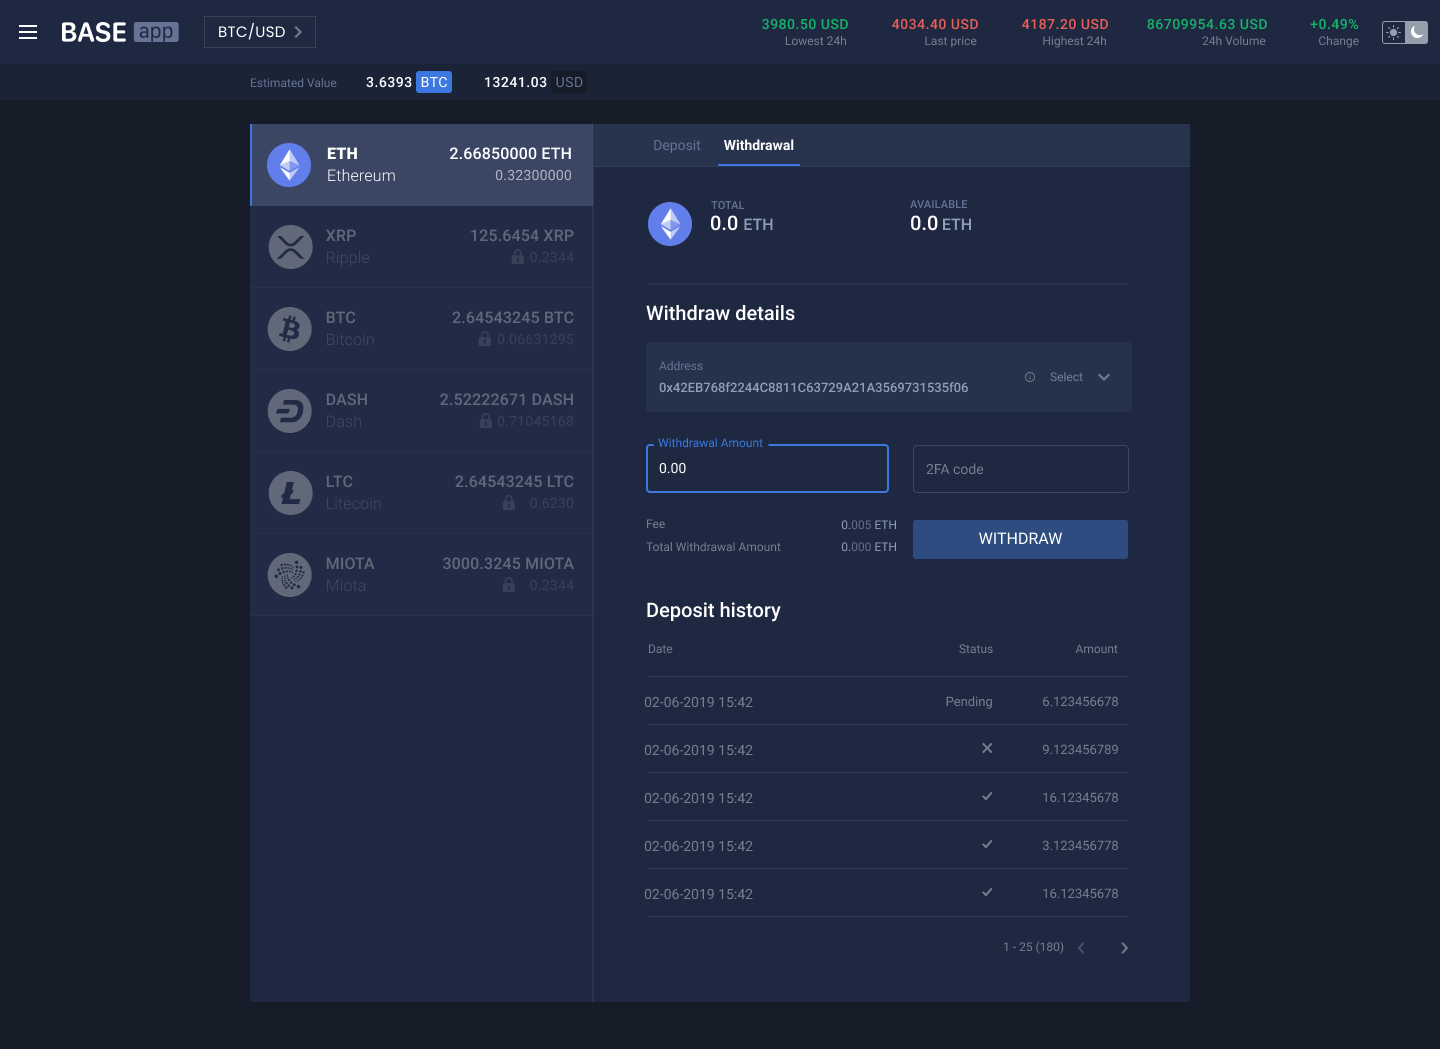
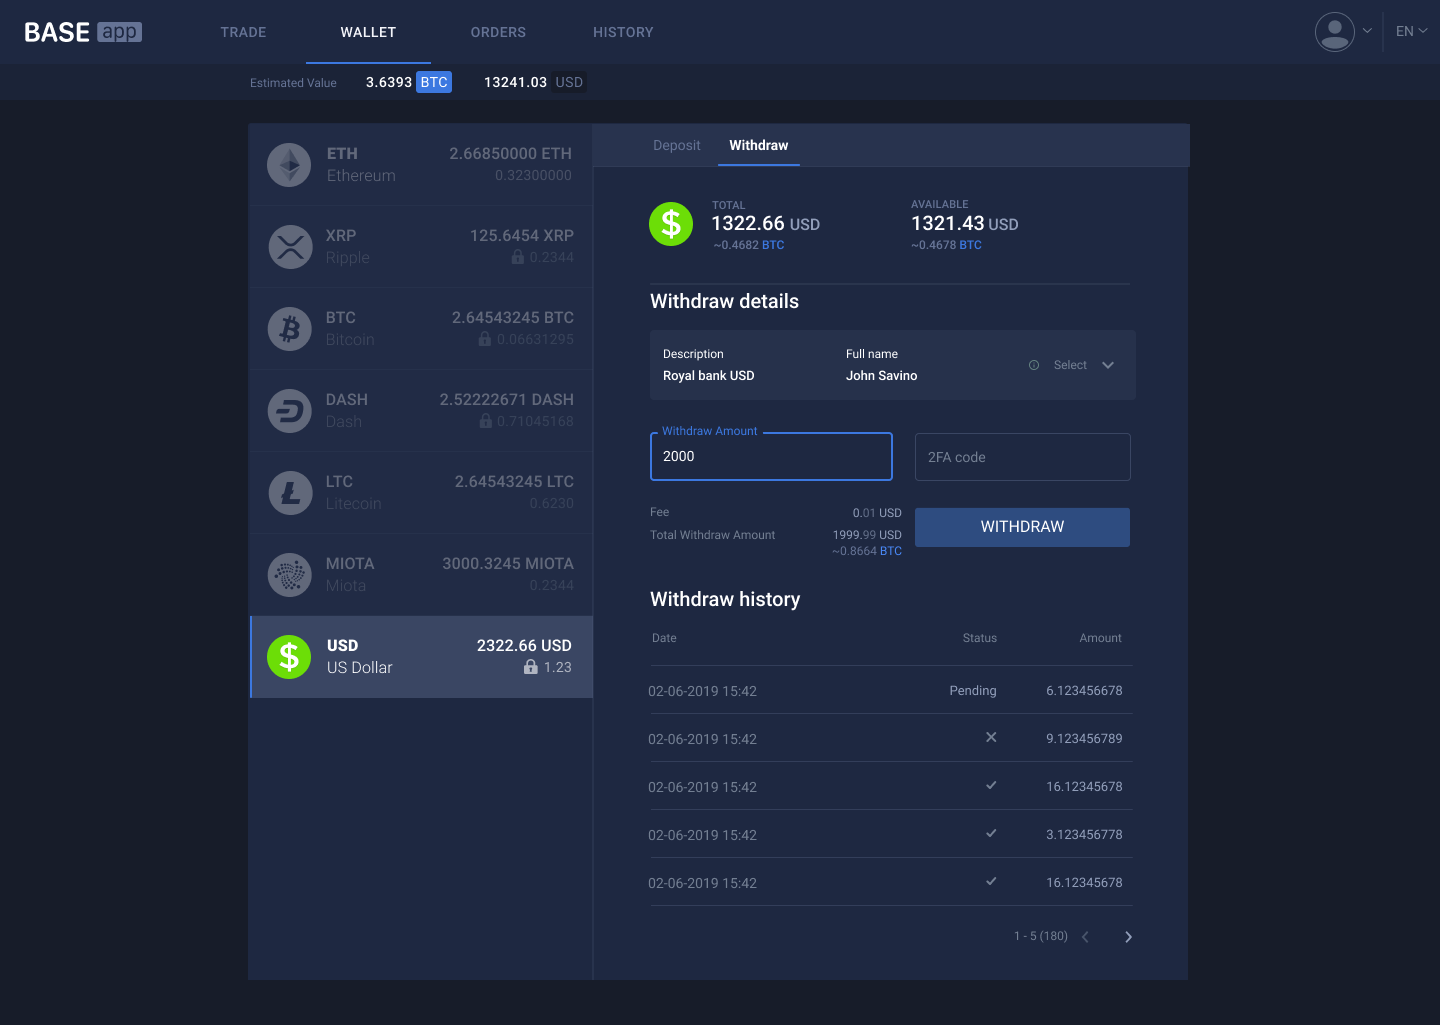
#4. Wallet page
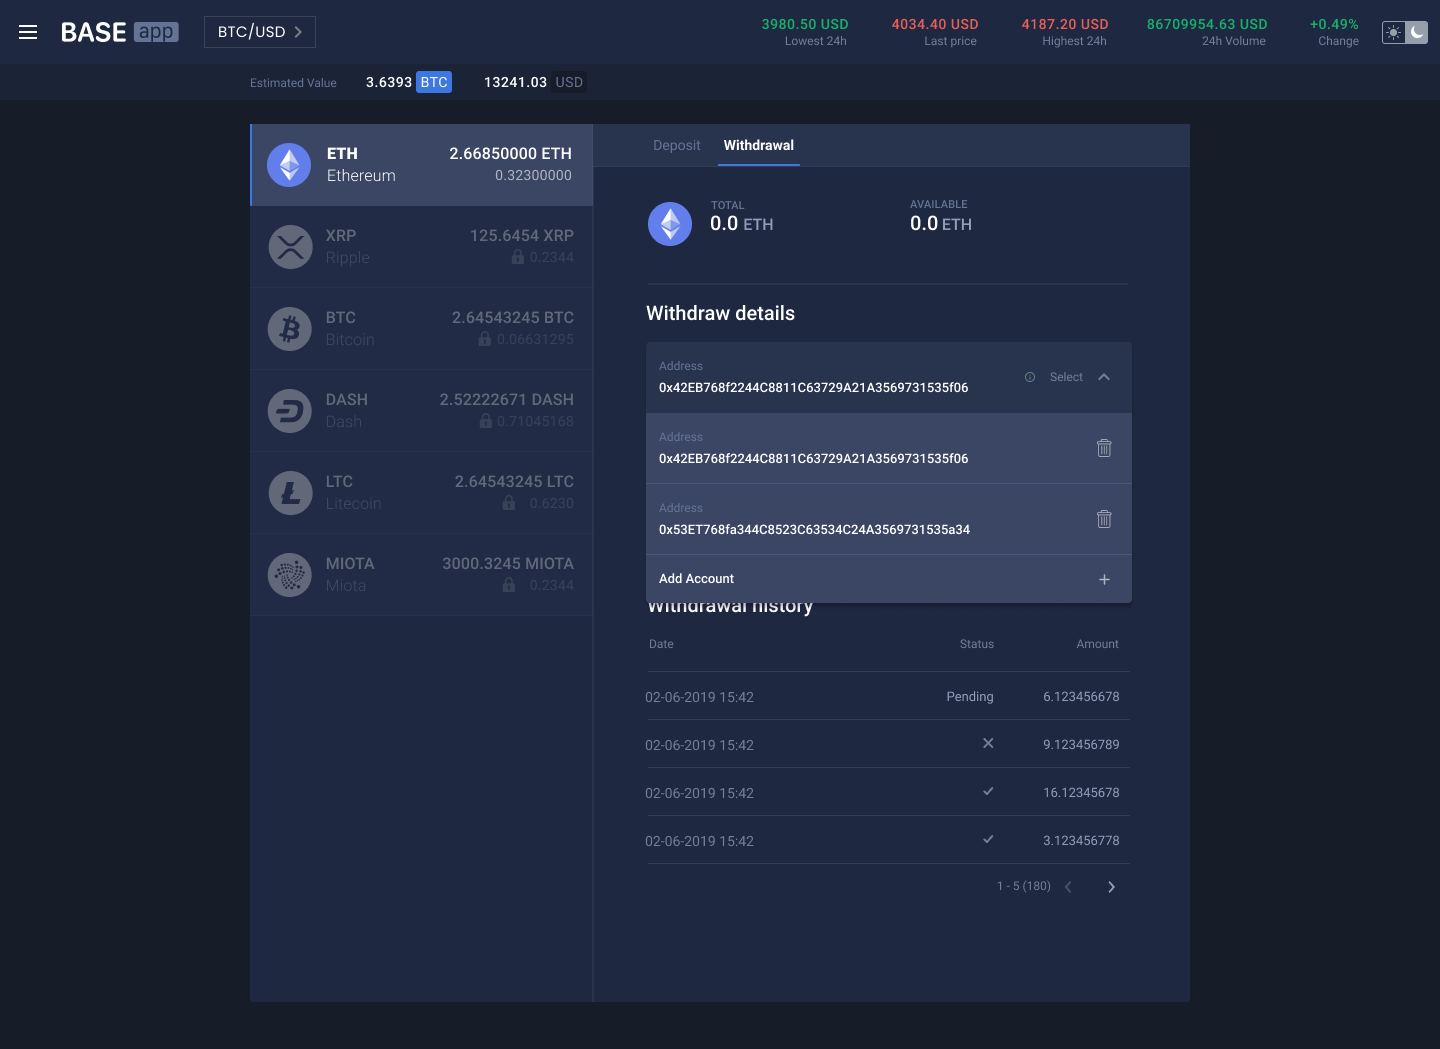
Wallet page has a list of wallets and provides functionality for depositing and withdrawal. This page consists of two blocks. The left side block represents wallets of different currencies. Wallet field contains a logo, a ticker, a full name of a currency, available and locked balances. The right side block serves for wallet interaction and has Deposit and Withdraw tabs. Wallets of crypto and FIAT currencies differentiates by required data for withdrawal creation.
Deposit tab - Crypto
The Deposit tab of cryptocurrency shows balances, a deposit address and a deposit history. To make a deposit, a user needs to use a deposit wallet. User can scan QR-code or can press the COPY button to copy a deposit wallet address. Deposit history is a table with recent deposits. Deposit record contains a date of deposit, a status of deposit and deposited amount. Deposits that are waiting for confirmation has a pending status.
Withdrawal tab - Crypto
Withdrawal functionality from version 2.3 working with beneficiaries. That adds a layer of security by whitelisting withdrawal wallet addresses and accounts. To be able to withdraw, a user needs to have a certain KYC level and needs to enable 2FA.
The Withdraw tab of cryptocurrency shows balances, a beneficiary field, a withdrawal amount field, a 2FA code field, the Withdraw button and withdrawal history. To make a withdrawal, a user needs to have a beneficiary account. If a user doesn't have a beneficiary, he should add at least one beneficiary by clicking Add Account field.
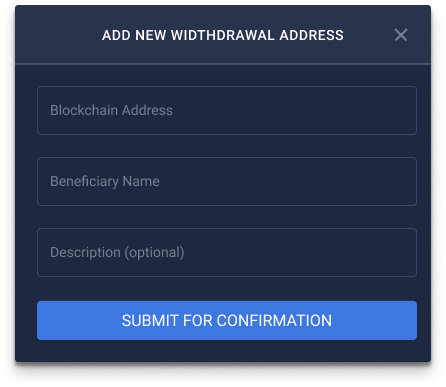
Clicking the Add Account field prompts a modal window. In that window, a user needs to write:
- a withdrawal address in the
Blockchain Addressfield; - a name for withdrawal address in the
Beneficiary Namefield; - description for that withdrawal address in the
Descriptionfield. That field is optional.
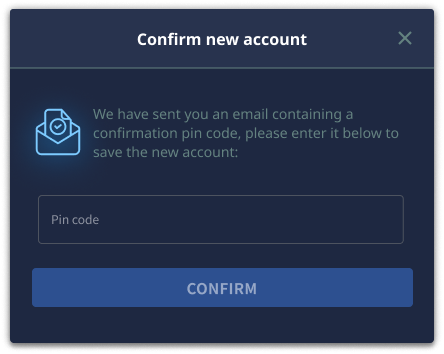
After filling the form, a user needs to click the SUBMIT FOR CONFIRMATION button. After submitting, the platform sends an email with a pin code and prompts a modal window for that pin code.
A user needs to enter the received pin code into the Confirm new account modal window and to press the CONFIRM button.
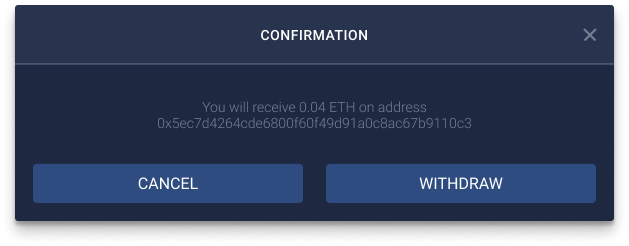
If a beneficiary account added successfully, a user can create a withdrawal specifying a withdrawal amount and 2FA code. After pressing the WITHDRAW button, confirmation windows appears. On the left side of WITHDRAW button, a user can see a withdrawal fee and amount that he will get on his wallet. Withdrawal History is a table of recent withdrawals. Withdrawal record contains a date of withdrawal request, the status of a withdrawal request and a withdrawal amount.
To confirm a withdrawal request a user needs to click on the WITHDRAW button. If a user wants to cancel a withdrawal request he needs to press the CANCEL button.
User can have more than one whitelisted address. To see detail information, a user can click the info circle icon. Also, a user can delete whitelisted addresses by clicking the bucket icon.
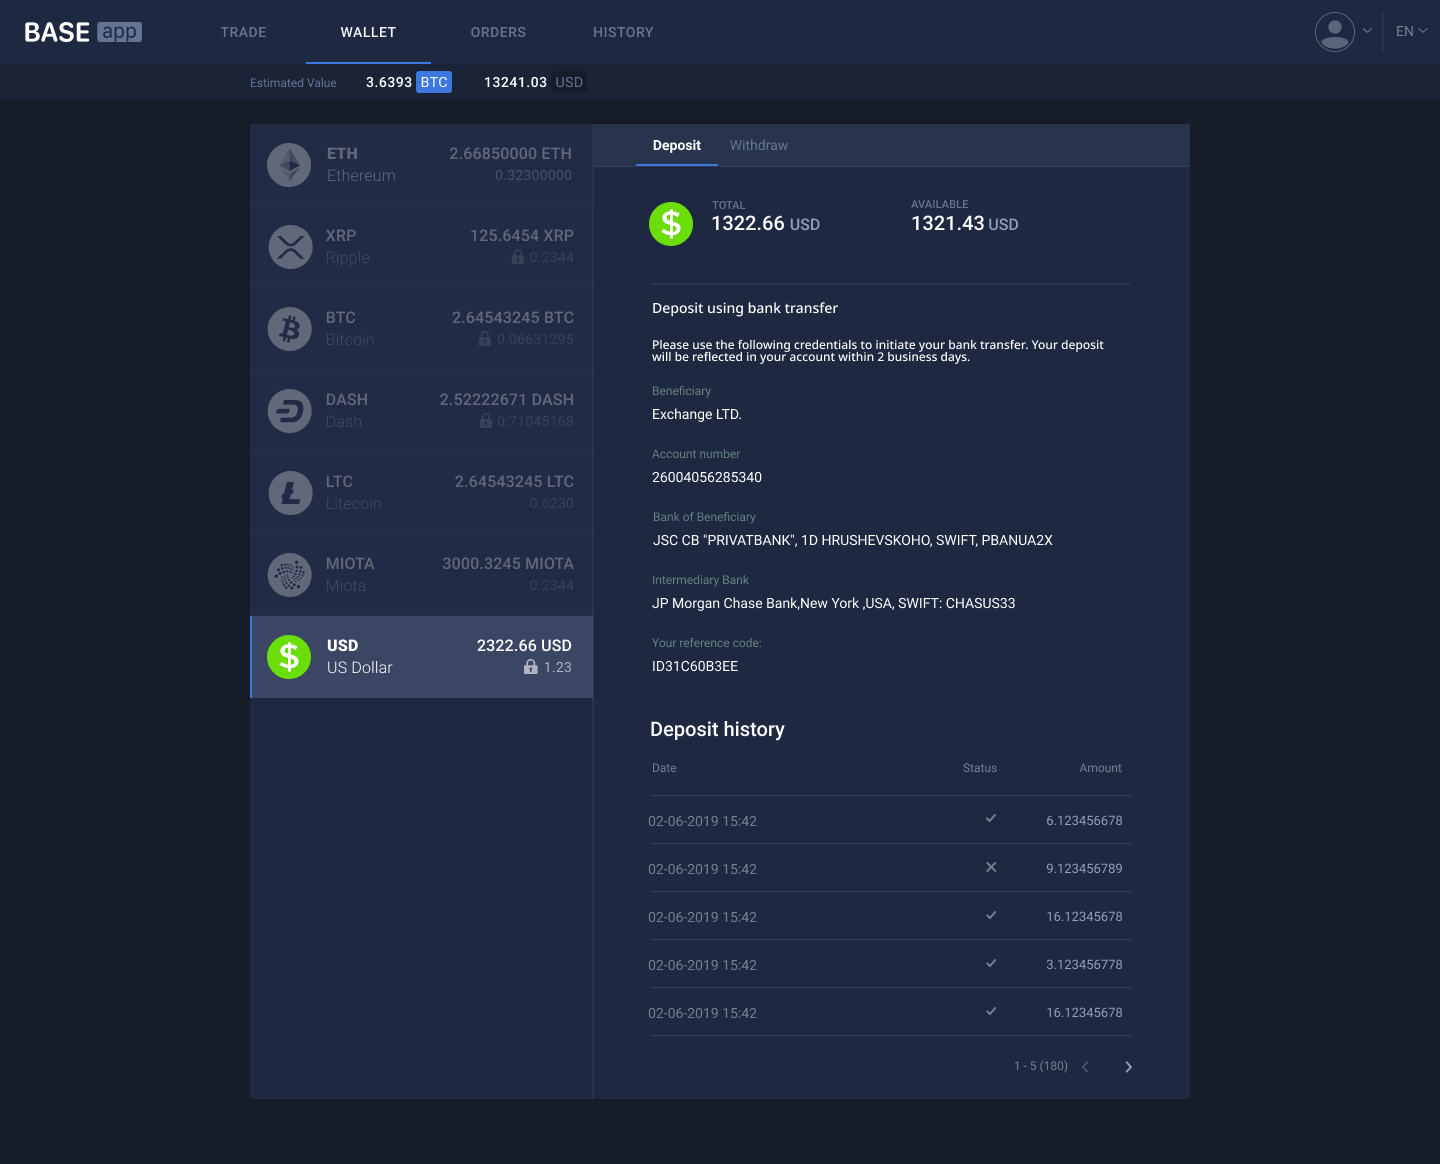
Deposit tab - FIAT
The Deposit tab of FIAT currency shows balances, a deposit address and a deposit history. To make a deposit, a user needs to use credential from the right side menu.
Withdrawal tab - FIAT
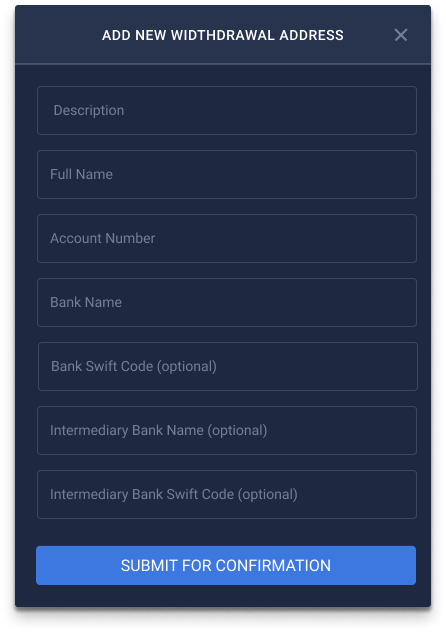
The Withdraw tab of FIAT has the same structure as a wallet of cryptocurrency. To make a FIAT withdrawal, a user needs to have a beneficiary account for FIAT. A user can add FIAT beneficiary by clicking Add Account field.

Clicking the Add Account field prompts a modal window. In that window, a user needs to write:
Descriptionis a field for beneficiary description;Full Nameis a field for user full name of that beneficiary;Account numberis a field for the bank account number of a user;Bank Nameis a field for the name of bank of the account number;Bank Swift Codeis a field for SWIFT code. That field is optional;Intermediary Bank Nameis a field for intermediary bank name. That field is optional;Intermediary Bank Swift Codeis a field for SWIFT code intermediary bank. That field is optional;
After filling the form, a user needs to click the SUBMIT FOR CONFIRMATION button. After submitting, the platform sends an email with a pin code and prompts a modal window for that pin code.
If a beneficiary account added successfully, a user can create a withdrawal. A user can create new FIAT beneficiaries and manage them in the same way as crypto beneficiaries.
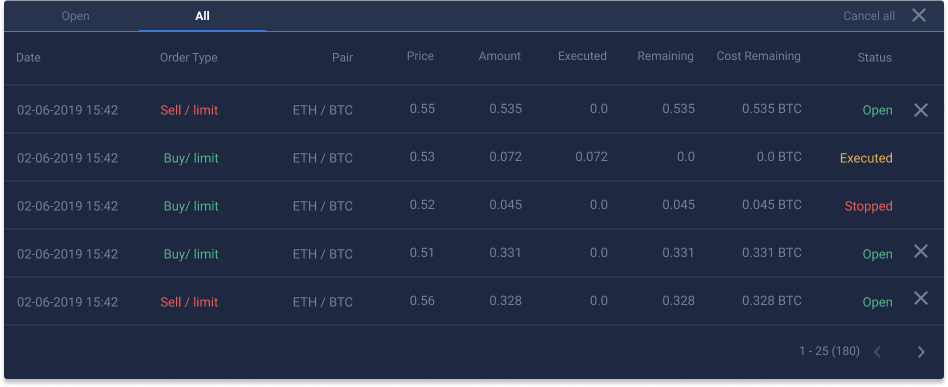
#5. Orders
Orders page represent user’s orders information. Page has two tabs: Open and All. The Open tab shows open orders. The All tab shows the orders history. A user can cancel all open orders by clicking Stop all button.
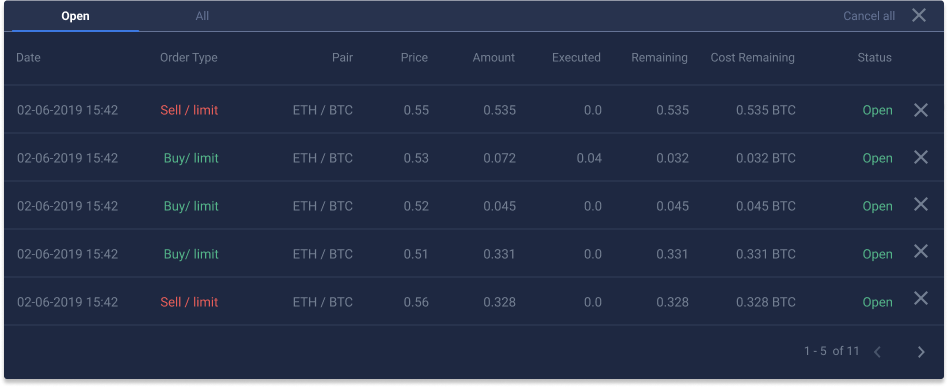
Field name description:
- Date: shows the date and time of order creation or date of the last update.
- Order type: shows the type of an open order.
- Pair: shows the market pair name of an open order.
- Price: shows the price of an order.
- Amount: shows the amount that placed in an order.
- Executed: shows an order amount that was executed (base currency equivalent).
- Remaining: shows an order amount to be executed (base currency equivalent).
- Cost remaining: shows remaining cost of the order to be executed (quote currency equivalent).
- Status: shows the status of an order. The
Opentab contains only orders withOpenstatus, theAlltab contains orders with statusesOpen,Stopped,Executed. - X: is a cancel button. A user can cancel an open order by clicking that button.
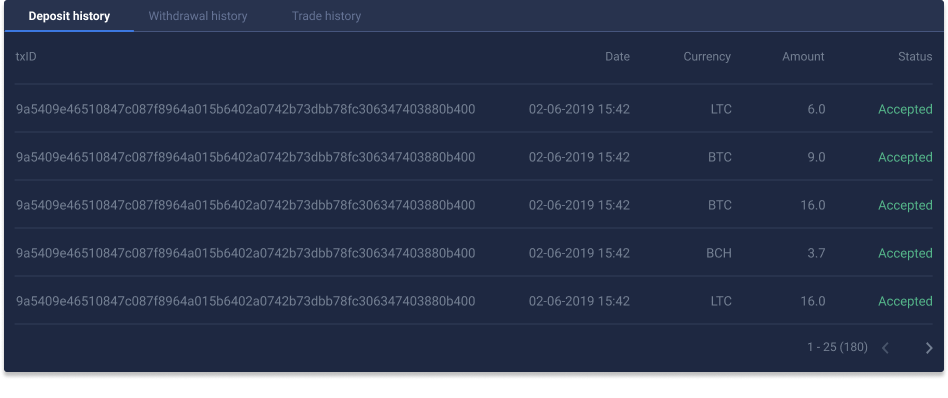
#6. History
History page contains historical data related to the user's finance movement. This page consists of three tabs: Deposit History, Withdraw History and Trade History.
Deposit history tab
Field name description:
- txID: shows the hash of a deposit transaction on a blockchain.
- Date: shows the date and time of a deposit.
- Currency: shows a ticker of deposited currency.
- Amount: shows a deposited amount.
- Status: shows the status of deposit. A deposit can can have one of the next statuses:
- Submitted is the initial state of a deposit. That status assigns to a deposit that was just detected.
- Accepted state means that the minimal number of confirmation blocks were successfully mined above the block with the deposit transaction.
- Collected state means that funds were collected to one or few platform wallets.
- Skipped state means that the platform tried to collect funds from deposit to platform wallet and fail.
- Rejected means that a deposit was rejected by the admin during the confirmation process.
- Canceled means that a deposit was cancelled automatically by some platform services.
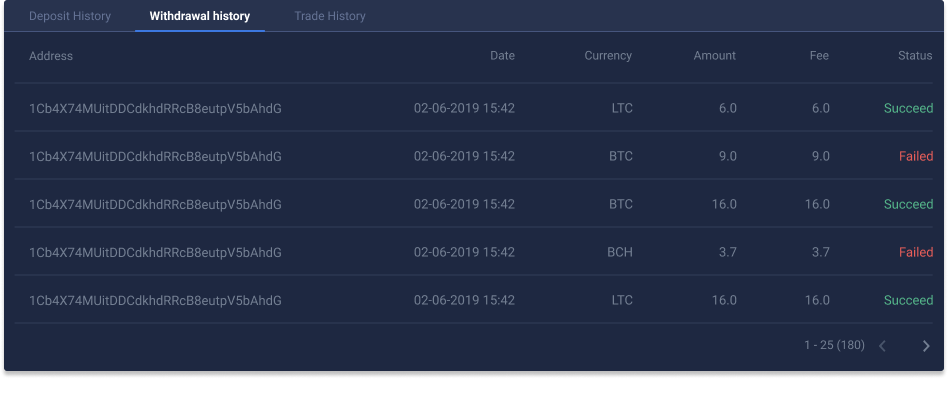
Withdrawal history tab
That tab contains the user's withdrawal history.
Field name description:
- Address: shows a user withdrawal address.
- Date: shows the date of withdrawal.
- Currency: shows the currency ticker of withdrawal.
- Amount: shows a withdrawal amount.
- Fee: shows the fee that the platform charged from a withdrawal.
- Status: shows the status of withdrawal. A withdrawal can have one of the next statuses:
- Submitted status means that the platform received withdrawal request for a user.
- Accepted status means that the request is waiting for further processing. If a withdrawal stuck with that status, it means that request exceeds some of the withdrawal limits.
- Processing status means that the platform prepares withdrawal to send it to a blockchain network.
- Confirming status means that a withdrawal was written into a blockchain and waiting for
Min Confirmationsnumber. - Failed status means that a withdrawal faced some issues during the processing.
- Succeed status means that a withdrawal was successfully recorded into a blockchain and reached
Min Confirmationsnumber. - Rejected status means that a withdrawal rejected manually, by the admin. Admin can reject a withdrawal that exceeds some of the withdrawal limits.
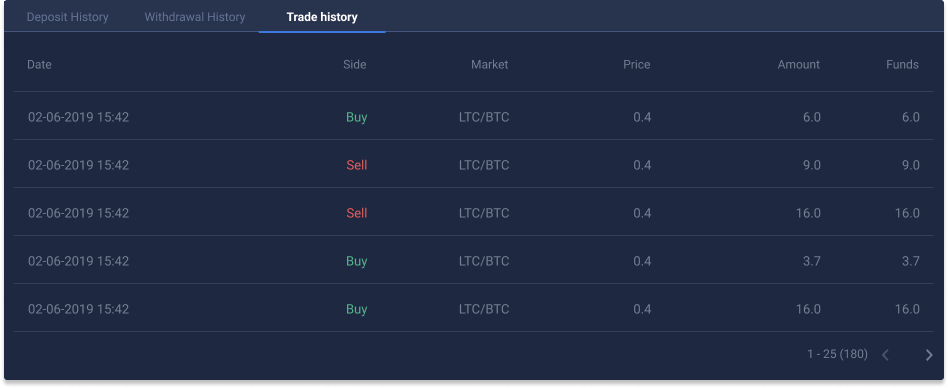
Trade history tab
That tab contains the user's trades history.
Field name description:
- Date: shows the date and time of a trade.
- Side: shows the side of a trade ('Buy' or 'Sell').
- Market: shows a market pair of a trade.
- Price: shows the price at which an order was executed.
- Amount: shows an amount of a base currency that was exchanged in a trade.
- Total: shows an amount of a quote currency that was exchanged in a trade.